Steps of Lesson Planning: A Simple Guide for Teachers
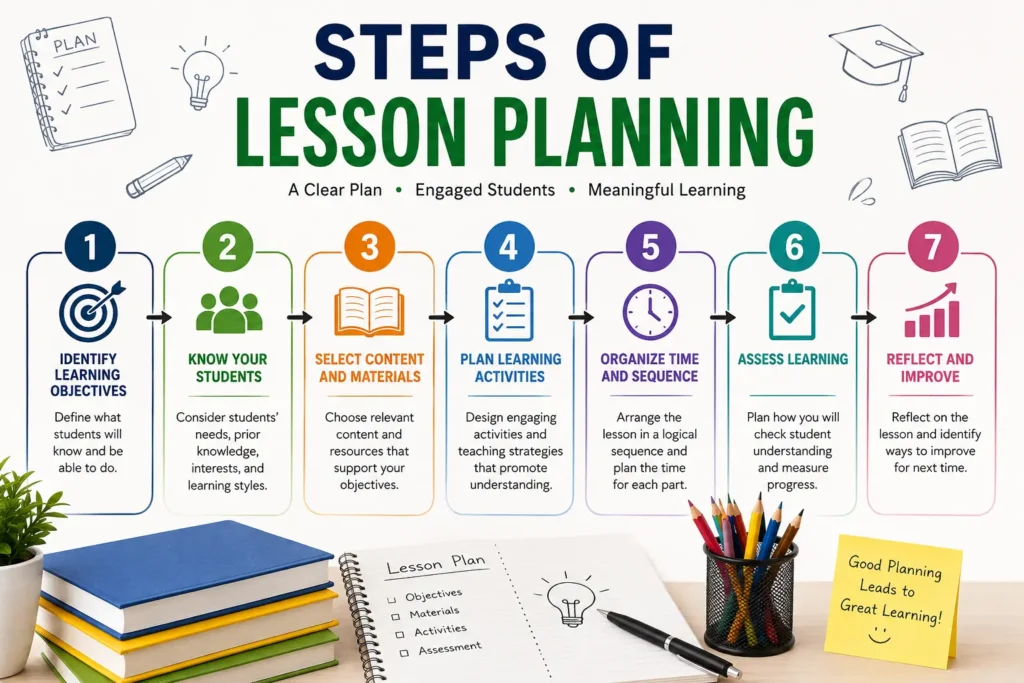
Lesson planning is the process teachers use to map out what they will teach, how they will teach it, and how they will know if students learned it. Knowing the steps of lesson planning helps new and experienced teachers build lessons that are clear, organized, and easy to follow. This guide breaks down each step in plain language so you can start using it in your own classroom today.
What Is Lesson Planning?
Lesson planning is a process where a teacher outlines learning objectives, plans activities, and prepares ways to check understanding before teaching a class. It acts like a roadmap. Without it, a lesson can feel messy or rushed.
Good lesson planning connects to bigger ideas like curriculum planning and instructional strategies. It also helps teachers use differentiated instruction, which means adjusting teaching methods to fit different student needs. If you want a deeper look at this topic, check out this complete lesson planning guide.
Step 1: Set Clear Learning Objectives
What is the first step in lesson planning? The first step is writing clear learning objectives. A learning objective states exactly what students should know or be able to do by the end of the lesson.
Objectives should be specific and easy to measure. Instead of writing “students will understand fractions,” try “students will be able to add two fractions with the same denominator.” This small change makes it easier to check learning outcomes later in the lesson.
- Use action words like explain, solve, or describe
- Keep objectives short and focused
- Make sure objectives match the grade level
Step 2: Plan an Engaging Introduction
Once your objectives are ready, plan how you will open the lesson. This step is sometimes called the anticipatory set. It grabs student attention and connects new material to what they already know.
A strong introduction might include a quick question, a short story, or a fun fact related to the topic. This step should be short, usually just a few minutes, but it sets the tone for classroom activities and student engagement.
Step 3: Design Learning Activities
This step is the main body of the lesson plan. It includes the teaching methods, instructional strategies, and classroom activities students will use to reach the learning objectives.
Direct Instruction
Direct instruction is when the teacher explains new information clearly, often using examples or visuals. This works well for introducing new concepts.
Guided Practice
After direct instruction, students practice the new skill with teacher support. This bridges the gap between learning something new and doing it independently.
Some teachers build activities around specific teaching models. For example, a constructivist lesson plan lets students build their own understanding through hands-on exploration instead of only listening to the teacher.
Step 4: Check for Understanding
How do you assess student understanding in a lesson plan? Teachers check understanding using formative assessment during the lesson and summative assessment at the end. Formative assessment includes quick checks like thumbs up or down, short quizzes, or class discussion. Summative assessment happens at the end of a unit, often through a test or project.
- Ask quick questions during the lesson
- Use exit tickets at the end of class
- Watch for confused faces or silence, which often signal a need to slow down
Step 5: Summarize and Close the Lesson
Every lesson needs a clear ending. This step, sometimes called lesson closure, helps students remember the main points. A short summary, a class discussion, or a quick review question all work well here.
Closing the lesson properly also gives the teacher one last chance to see if students met the learning objectives set in step one.
Step 6: Build a Realistic Timeline
How do you manage time in a lesson plan? The final step is estimating how much time each part of the lesson will take, then adding extra time as a buffer. This helps avoid rushing through activities or running out of time before the lesson ends.
A simple way to do this is to write a time estimate next to each part of the plan, such as five minutes for the introduction or fifteen minutes for guided practice. Experienced teachers often build in a few extra minutes for questions or unexpected slowdowns.
What Makes These Steps Work Together
Following these steps in order creates a lesson that flows naturally from start to finish. Objectives guide the activities. Activities lead to checking understanding. Understanding leads to a strong closing. Each step supports the next one.
If you want to see what separates a good lesson plan from a great one, read more about the characteristics of effective lesson plans. This can help you fine tune your lesson plans after you have the basic steps down.
Final Thoughts
Planning a lesson does not need to feel complicated once you break it into clear steps. Start with strong learning objectives, build activities that fit your students, check for understanding along the way, and close with a solid summary. Small improvements in each step, like better time management or more engaging activities, add up to stronger lessons over time.
Ready to go deeper into lesson design? Explore our full lesson planning guide for more tips, examples, and planning tools you can use in your next class.